ASV Attestations
If you requested an ASV Attestation of Scan Compliance (AoSC) in Step
2 of the wizard when you created your scan job, then there are several
requirements you must satisfy before the attestation can be issued. Use
the following steps after the scan completes to fulfill these requirements.
Go to the Results tab
and choose the PCI Attestation report type from the drop-down menu.
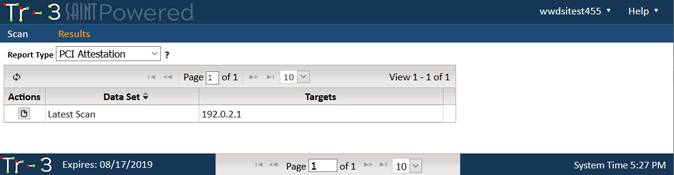
Click on the Create Report
button beside the desired data set.
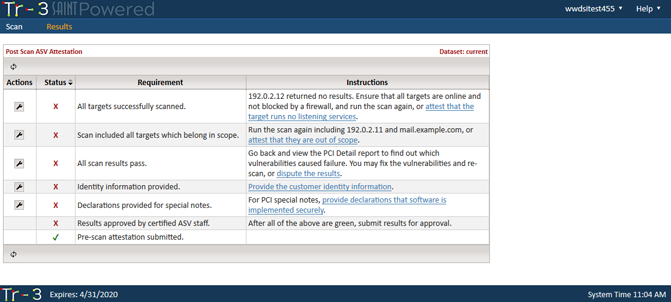
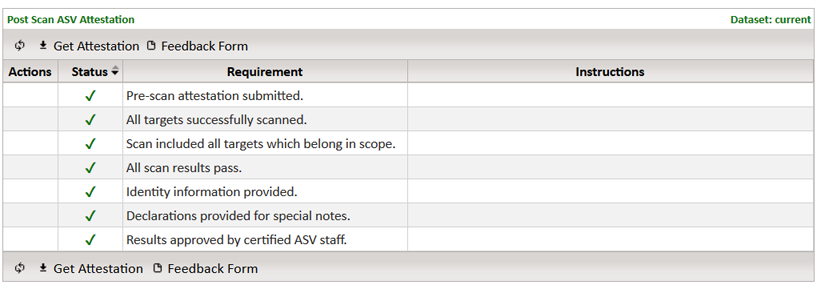
For each row of the checklist which has a red X in the Status
column, follow the instructions in the Instructions column. Click
on the wrench icon in the Actions column or the appropriate hyperlink
in the Instructions column to complete each required task. See the
following sections for additional information.
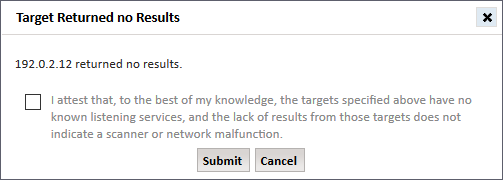
Targets Running No Services
If the scan detected one or more targets with no listening services,
you must confirm that this is the correct result, and not indicative of
a scan malfunction. If this is the correct result, click on the
action button beside All targets successfully
scanned or click on the attest
that the target runs no listening services hyperlink, check the
box, and submit the form.
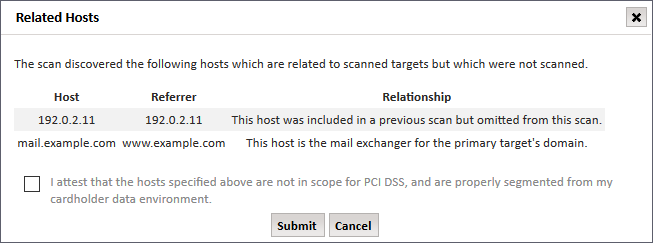
Scan Scope
The PCI DSS requires scanning of all externally accessible system components
owned or utilized by the scan customer that are part of the cardholder
data environment or may provide access to the cardholder data environment.
Although proper scoping is the responsibility of the scan customer, the
ASV is required to report any potential scoping discrepancies and confirm
with the customer that they are out of scope. If potential scoping discrepancies
are found, click on the action button beside Scan
included all targets which belong in scope or on the attest
that they are out of scope hyperlink. This displays a table containing
information about each scoping discrepancy. If each of the listed
components are truly out of scope, check the box and submit the form.
Vulnerability Disputes
If vulnerabilities which cause PCI failure are detected, the customer
may either remediate the vulnerabilities and run the scan again, or else
dispute the failing vulnerability findings. A vulnerability may
be disputed for the following reasons:
False positive – You may dispute the vulnerability if you believe
the vulnerability does not actually exist on the system.
Compensating controls – You may dispute the vulnerability if
there is an acceptable compensating control in place which eliminates
the risk of the vulnerability.
Incorrect CVSS score – You may dispute the vulnerability if
you believe the CVSS score is incorrect.
If you choose to dispute the findings, follow these steps:
From the Post-scan ASV Attestations grid, click on the action
button beside All scan results pass
or the dispute the results
hyperlink.
Click on the New Dispute
tab.
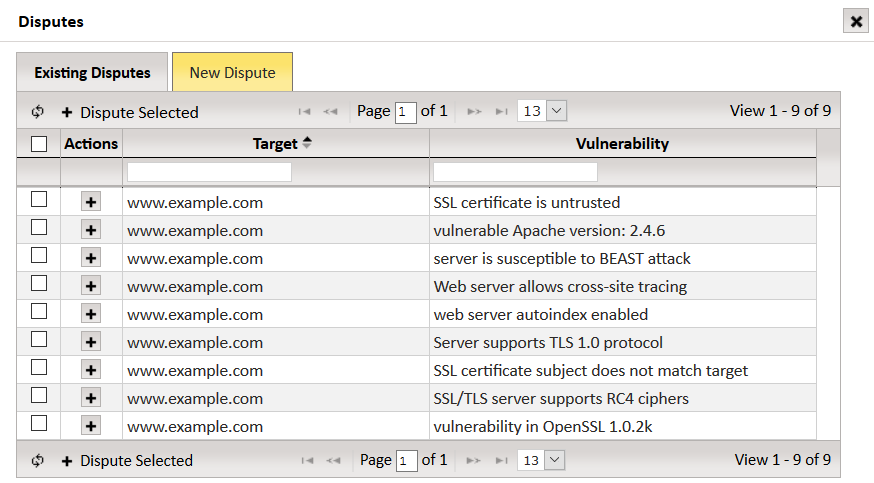
Click on the Dispute
button (plus icon) beside the vulnerability that you wish to dispute,
or check the rows corresponding to the vulnerabilities you wish to
dispute and click on Dispute Selected.
If the vulnerability you are looking for does not appear on the first
page, use the pager buttons at the top and bottom of the grid to page
through the vulnerabilities, or enter terms into the filter boxes
at the top of the columns to search for the vulnerability.
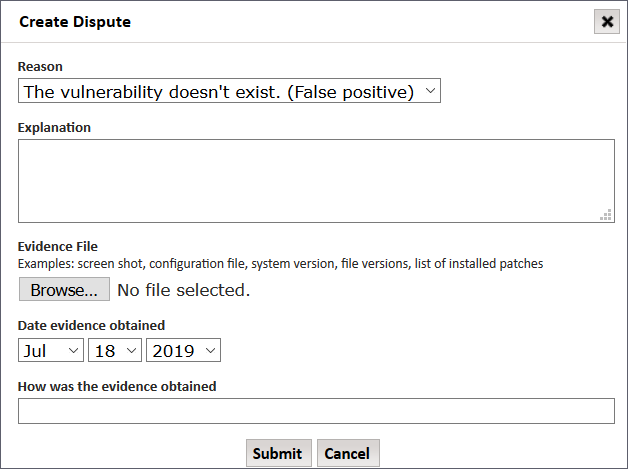
Complete and submit the Create
Dispute form. Be sure to provide a detailed explanation and/or
evidence that supports your claim that the vulnerability should not
cause PCI failure. For example, if the vulnerability finding is a
false positive resulting from backported fixes in Linux packages,
you may want to include a screen shot which shows the installed package
version.
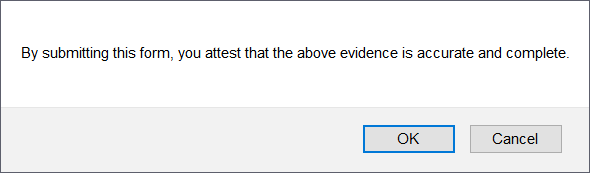
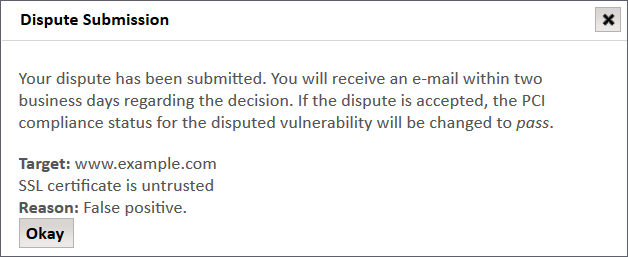
Click on the OK button
to attest that the submitted evidence is accurate and complete. That
will result in a message informing you that the dispute has been submitted
to the ASV staff.
When the ASV staff has made a decision regarding the dispute,
you will receive an e-mail notification informing you of the result.
The result will be one of the following:
Approval – The vulnerability
status is changed to Pass, and the ASV’s reason for approving
the dispute will appear in the Exceptions column of the ASV Executive
report. This text cannot be modified by the customer.
Denial – The vulnerability
status remains unchanged. The ASV’s reason for denying the dispute
is provided in the e-mail notification. The dispute cannot
be modified, but a new dispute for the same vulnerability can
be created. Appeals may be sent to support@saintcorporation.com.
Appeals should not be
sent to the PCI SSC.
Request for more evidence
– The ASV requires further information or evidence in order to
make a decision regarding the dispute. See the next paragraph
for information on modifying your dispute.
If you wish to check the status or modify a dispute you’ve already submitted,
follow these steps:
From the Post-scan ASV Attestations grid, click on the action
button beside All scan results pass
or the dispute the results
hyperlink.
Click on the Existing Disputes
tab. The status of each existing dispute will be one of the following:
Open – The dispute
is being reviewed by ASV staff.
Pending – The ASV
staff is waiting for the customer to provide additional evidence.
Accepted – The dispute
has been accepted.
Denied – The dispute
has been denied.
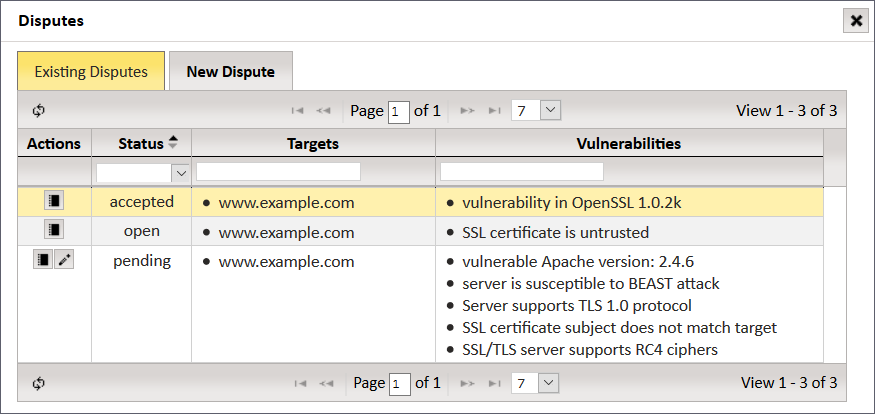
Find the desired dispute on the grid.
If it doesn’t appear on the first page, use the pager bar at the top
or bottom of the grid to page through the disputes, or use the filter
boxes at the top of each column to search for the desired dispute.
To view the activity regarding a dispute,
click on the Log button (notebook
icon) under the Actions column for the desired dispute.
For
pending disputes only: Click on the Edit
button (pencil icon) to open a form allowing you to modify the dispute
or upload additional evidence. This form is similar to the form you
originally used to create the dispute. Submitting this form will change
the dispute status back to Open.
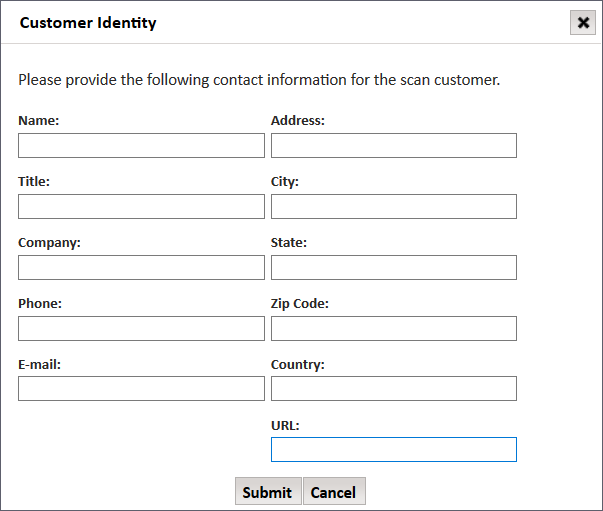
Customer Identity
All ASV scans require certain information about the scan customer in
order to complete the Attestation of Scan Compliance. Click on the action
button beside Identity Information Provided
or click on the Provide the customer
identity information hyperlink to enter this information.
Special Notes
The ASV Program Guide specifies that certain findings be documented
in the ASV Executive report as special notes. These are findings which
don’t necessarily cause failure, but still require a declaration from
the customer to assure the ASV that they do not expose the cardholder
data environment to any unnecessary risk. To view the special notes and
enter declarations:
Click on the action button beside Declarations
provided for special notes or on the corresponding hyperlink.
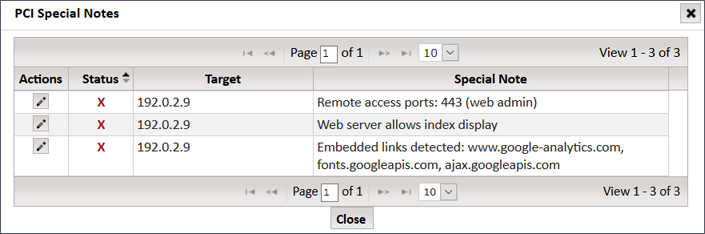
Click on the Edit button
(pencil icon) beside any of the special notes which has a red X. This
brings up a dialog providing further instructions and a form to enter
the declaration.
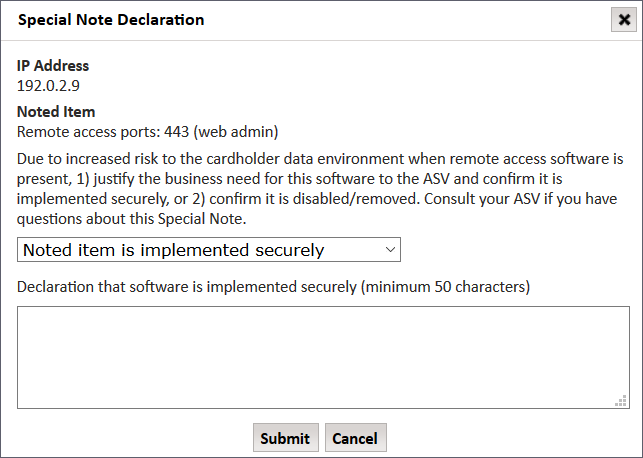
Choose the appropriate option from the drop-down menu and enter
a declaration which satisfies the instructions. Then click on the
Submit button.
Repeat the previous two steps until all rows in the special
notes grid have a green check mark.
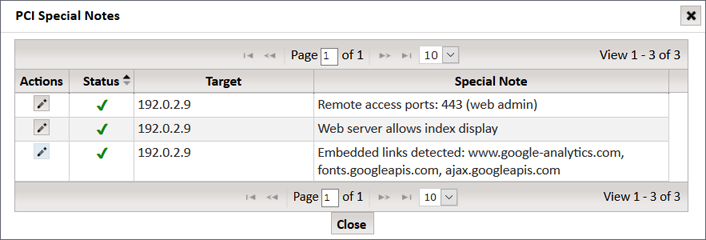
Click the Close button.
Final Approval
After all of the other rows in the Post-scan ASV Attestation grid have
green checkmarks, you may submit the scan for final approval by the ASV
staff.
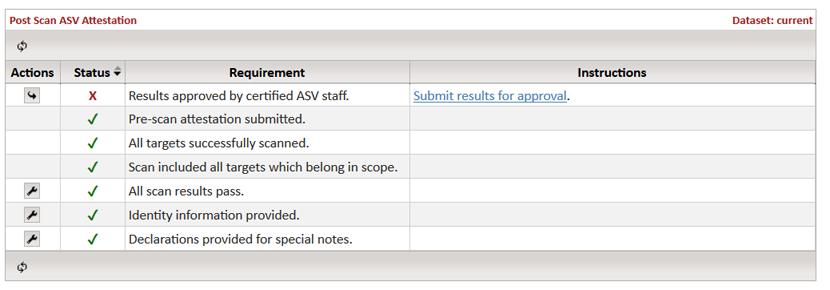
To submit the scan for final approval, click on the action button beside
Results approved by certified ASV staff
or on the Submit results for approval
hyperlink. After the ASV staff has reviewed your scan report, you will
receive an e-mail notification of the decision. There are two possible
outcomes:
Denied – The ASV staff
did not accept the scan report. The explanation for the denial can
be found in the e-mail notification as well as in the Post-scan ASV
Attestation grid. If the explanation warrants it, you may go
back to the Post-scan ASV Attestation grid and make corrections, and
then re-submit the report for approval.
Accepted – The ASV staff
accepted the scan report. Go back to the Post-scan ASV Attestation
grid and click on the buttons at the bottom of the grid to download
the Attestation of Scan Compliance and ASV Feedback Form.