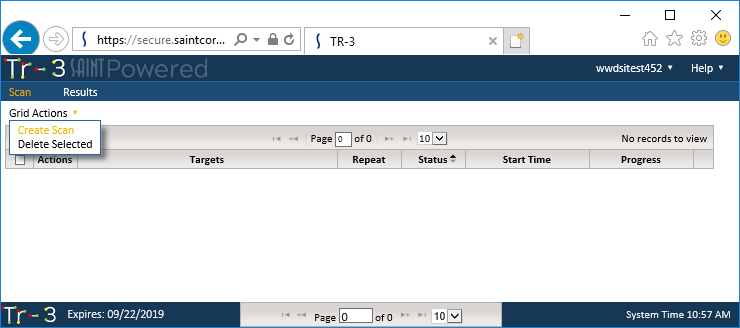
Initiating a Tr-3 scan is done from the Scan
tab. As shown below, creating a new scan is done by selecting the Create Scan option from the Scan
page’s Grid Actions drop down menu.
The screen will refresh to display the Scan creation wizard, as shown below. The wizard will display the current list of scan targets you have registered with your license, as well as Selection Methods for selecting from the Pick List (check boxes) or free-form entry.
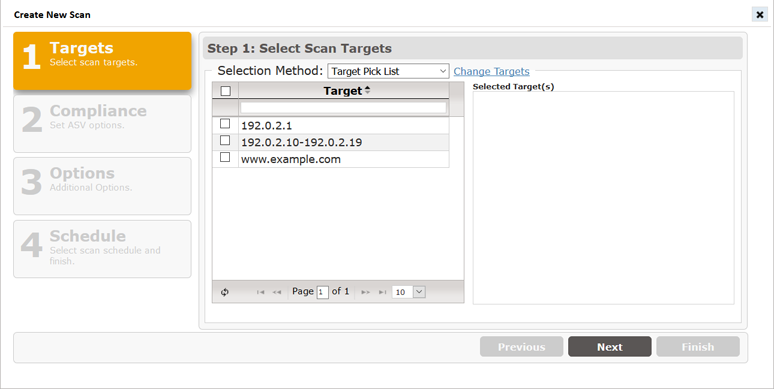
The list of available targets should be the same full list of targets you registered with your license. The Target selection step provides the follow options:
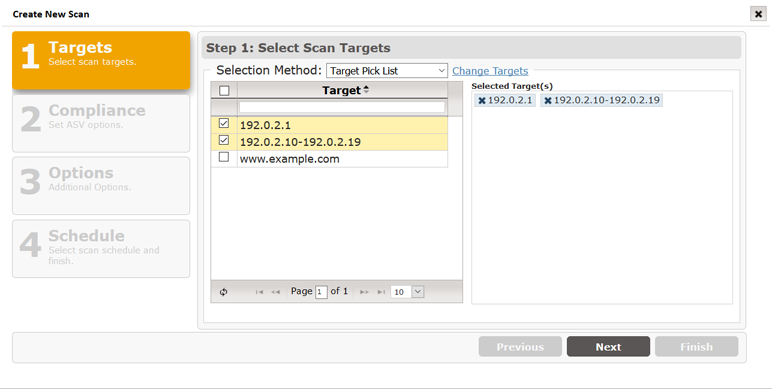
Select from a “Pick List” of available targets
Click the checkbox for each host to be scanned. All selected targets will be added to the “Selected Target(s)” box.
Choose Free form target entry
to manually type the list of targets to be scanned. Press the Enter key once all of your hosts
have been entered.
If your target list includes any hosts other than the ones from your registered targets, you can make changes to the target list by clicking on this option, and certifying you have permissions to access and scan these new hosts.

Click this option to display a Change Request Form that includes the license and service agreement that you have authorization to scan the new host, as well as form fields to enter the new target addresses, as well as a field to enter the target addresses to be removed to stay within the target volume of your current license. If you wish to add additional targets to your license during your subscription period, contact our Sales team to amend your existing license.
Click the Next button to move to the next step in setting up a scan.
This Compliance (Set ASV options) step is specifically designed to support the Payment Card Industry (PCI) Approved Scanning Vendor (ASV) Attestation of Scan Compliance (AoSC) requirement. As a user of Tr-3, you have the option to run scans of your selected hosts, whenever you like, at whatever frequency you need to support your ongoing assessment of the vulnerabilities impacting your host environment. At no additional charge, you also have the option to submit a scan result for Attestation of Scan Compliance (AoSC), if your environment is a cardholder data environment (CDE) and you must comply with the PCI mandates for a quarterly attestation by an ASV.

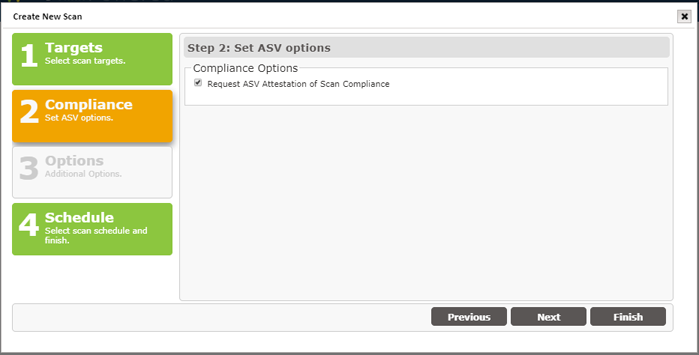
By checking this box, your scan results will be assessed against the PCI ASV Program Guide’s metrics and standards; and adhere to vulnerability scanning requirements as defined by the latest PCI Data Security Standards (DSS), Requirement 11.2.2.
Click the Next button to move to the next step in setting up a scan.
The Tr-3 scan process can be performed quickly just by selecting the target hosts and scheduling the scan. However, the following “Additional Options” are provided to enable additional types of checks and/or use credentials to facilitate lower levels of access to system resources.
Note: These options will not be active for ASV Attestation scans. All PCI-required scan configurations are controlled by the SAINT pre-configured ASV scan policy.
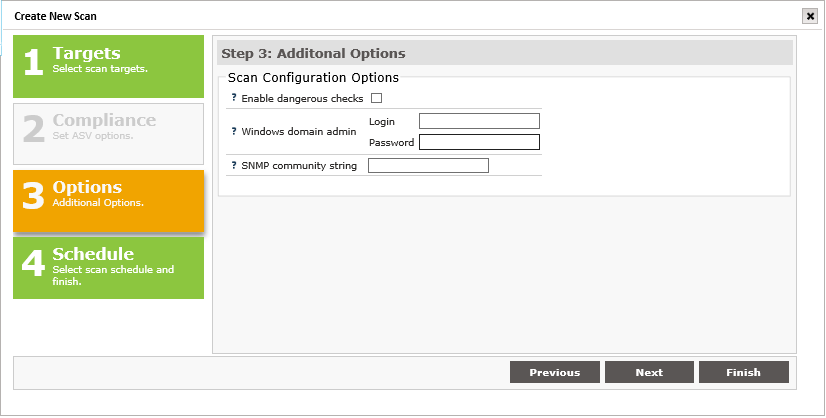
The following describes each option and how to enable them during the scan setup process.
Enable dangerous checks
Tr-3 includes an option to "Enable dangerous checks." If this option is enabled, Tr-3 will launch buffer overflow exploits which yield more definitive results. This option may help Tr-3 eliminate false alarms by verifying the existence of certain vulnerabilities but can cause services on the target hosts to crash. If this option is not selected, Tr-3 will skip these dangerous tests and will report a potential problem if there is a possibility that the vulnerability exists.
Windows Domain Administrator
To conduct the most thorough and accurate
scan possible, Tr-3 gives you the option of authenticating to targets.
Authentication allows Tr-3 to access the registry and file attributes
on the remote target. There are two benefits to authentication.
An authenticated scan can detect additional vulnerabilities, such as client vulnerabilities and missing hotfixes, which could not otherwise be detected by probing network services.
An authenticated
scan is sometimes able to check for fixes whose presence could not
otherwise be determined, thereby reducing false alarms.
For authentication to Windows targets, enter a valid login and password with administrative privileges on the domain.
Keep in mind that Tr-3's detection of Windows updates should be used as a baseline assessment only. Tr-3 detects Windows updates using simple checks for the presence of registry keys and file time stamps, which cannot always account for updates that have been incorrectly installed, uninstalled, rendered ineffective due to incorrect order of installation, or other unusual situations. For a more thorough evaluation of Windows updates, it is advisable to use one of several available patch management tools.
SNMP Community
The Simple Network Management Protocol (SNMP) runs on routers and switches, as well as some printers, servers, and workstations to communicate configuration and status information. SNMP access is controlled using communities. A community string identifies the community and can be thought of as the password for SNMP access.
Click the Next button to move to the next step in setting up a scan.
Scans can be performed immediately from Tr-3 or they can be scheduled to run at a defined date/time or scheduled intervals. For example, you may want to run a scan immediately to assess the current security posture of target hosts prior to submitting a scan for ASV Attestation. Then, once you’ve gone through that process and have determined your schedule for quarterly report, set up a recurring schedule to sync with your PCI reporting requirements.

Click the Finish button to start your scan now or scan on the selected Schedule.
Scans submitted for ASV attestation will enter our formal PCI ASV attestation process. As part of that process, the PCI ASV Program Guide requires scan customers to attest to specific questions regarding the scan environment, and permission granted to SAINT, as your ASV, to conduct the vulnerability assessment.
If you checked the Request ASV Attestation of Scan Compliance box in Step 2 above, then the Pre-scan Attestation form will appear after you click on the Finish button in the scan wizard. An example of this Pre-scan Attestation form is shown below.

After Checking the box for each required attestation question, a Continue option will be displayed.
Check the Continue button to complete the Pre-scan Attestation step and schedule your scan.
After the scan is complete, the PCI Attestation report will provide instructions on how to proceed – including processes for disputing results, entering declarations for special notes, validating the scope, etc.